Friday 26 August 2011

What I am loving,.. PRIMER!

I haven't used a primer in a long time, I was using Elf's Studio Primer, however over the summer my skin became oily and I found this product a tad greasy, in fact it was doing more bad than good and making most of my make up slide off. 
Now I am well under way with my "combat oily skin" plan, I decided to try out a new primer. This being Benefit's "The POREfessional".


These images are straight from the Benefit website, purely because I do not have the primer in its original packaging.
After hearing many a good thing about this, mainly being that it is oil free, I decided to waddle to my nearest Benefit counter to try it out. As I previously mentioned my skin has gone a little crazed as of late, and because this product retails at £23.50 I didn't want to splash out all that cash to find it just made the skin situation worse. So I was brave and asked for a sample just to try before I buy.
I am sooooo glad I have had a chance to try this product, it is fantastic! I find it really mattifies the skin, sinks in so well and leaves my face looking almost perfect :)
I'll let you read Benefit's claims : "Quickly minimize the appearance of pores! Apply this silky, lightweight balm for translucent pore coverage and smoother-than-smooth skin. Pores...now you see 'em, now you don't! Complements all skin tones"
It does all of the above and more! I love it has a slight tint to it, this doesn't really add a colour to your skin but evens out the skin tone and takes away any redness. I noticed my pores did look so much smaller and my skin just looked and felt amazingly soft. 
I shall be skipping back to Benefit at the first opportunity to purchase the full size tube, I suggest you do too, or be cheek like I did and ask for a sample, it will easily last for a few days application. 
10/10!!!!
Thanks for reading, Stay Classy xox

Monday 22 August 2011

Nails Of The Day - Taping Technique

I found a simple and easy way to transform the nails into looking all professional and the likes, using,.... CELLO-TAPE. Yes my friends, something you all have lying around the house somewhere, so there is no excuses for not trying this one out.
I was inspired by this video by sokolum79 who I follow on YouTube. Check it out, it goes into much greater and better detail than I will.
I just wanted to show you guys my nails of the day using this technique and what I used to get it. 


  • Base Coat - Rimmel Nail Rescue
  • Two coats of Beauty UK Glam Nails in Peach Melba
  • One coat of Barry M - Pink Iridescent
  • Tips in Barry M - Mushroom
Really quick and easy to do, my advice is to make sure each layer is completely dry before sticking the tape on as it will all rip off.
Thanks for reading.
Stay Classy

Matchy matchy make-up,...?

Just a quick post.


I was intrigued when Lisa Eldridge posted a video with the title "Matchy Make-up", the contents of which blew me away. She describes this as the new 'look' or 'style' of make up on the catwalk for this Autumn and Winter. Basically matching your eyes, lips, cheeks and even nails in a similar shade or hue. You need to go check out the overall effect in here video, this is the link.
I gave this a little try myself, it was so simple to do and cut about 20 mins off my usual getting ready time. The overall effect is so classic and really flattering. 


The products I used apart from my usual foundation/skin routine were:

  • Elf Duo Eye Shadow Cream - Butter Pecan. I used the lightest shade all over the lid and up towards the brow bone as a base.
  • La Femme Blush - Cinnabar, I dusted this all over the eye lid and again up towards the brow, no definite shape, just a wash of colour. I also used this on the cheeks.
  • Mac Viva Glam Gaga 2 on the lips.
  • Accessorize Baked Bronzer - Shade 1, I used this to highlight the cheek bones, under the brow and a small amount in the inner corner of the eye.

I then applied black eyeliner to my waterline and slatherings of black mascara to both sets of lashes.


Hope you like the overall look, and go check out the video.
Stay Classy

Eyebrow Threading,. the joys of

I used to swear by eyebrow threading when I was at University, and used to get mine done once a month by a lovely little women near my campus. However now I'm finished it is a bit of a commute just to get them done so I have been on the look out for a new place to go nearer my home. I live in Newcastle and a new brow bar opened up Fenwicks which is in the city centre, I was up there over the weekend so decided to give it a try.


Let me fill you in on the concept of threading:
'Practitioners use a pure, thin, twisted cotton thread which is rolled over untidy hairlines, moustashes and other areas of unwanted hair, plucking the hair at the follicle level. Unlike tweezing, where single hairs are pulled out one at a time, threading can remove an entire row of hair, resulting in a straighter line. As a larger area of hair is removed at once, however, it can be relatively painfu'


The place I went is more of a stand or booth inside a department store, and is called Glow, you can check their website out here.


What I can say is expect to feel like a caged animal in a zoo, as people walk past and have a good look at you and even throw the odd sarcastic comment, but all of this I can deal with if the outcome is good. The pain is totally bearable and the whole process lasts no longer than 10mins so even if you do find it hurts you, it won't be for long. You do have to help her stretch the skin above your eye a few times, but this is nothing daunting, just a simple placement of your fingers above and below the brows. Oh and to finish she trimmed the hair using a mini comb and small scissors to get rid of any crazy thickness is my brow.


 The outcome was good, not as great as my old place, but I have to accept that I shall never be going there again and move on. The women who work there are less than friendly however and do not expect any chit chat from them, or manors for that fact. Hahaha I am really not painting a great picture here. Overall I do love the way she has shaped my brows, she managed to get rid of every last stray hair and has done a really good job.


It cost me £14 for the eyebrow threading but you can block book and get 6 sessions for £60, making each treatment £10 each and saving yourself some dollar. 


I think I am still searching for the perfect place to go for this, I wouldn't go back here in a hurry, unless I really needed them done for a certain occasion just because like I say I did not rate the customer service skills at all. Maybe you have had a different experience with Glow, if so please let me know I'd love to hear about it.
Thanks for reading, Stay Classy xox

Hair Dying Process

So last week I wrote about how to keep white hair in good condition and more to the point keep its colour. My main advice would be to go to a salon to get this done as they tone it all properly to reduce any brassy tones.
I had an appointment on Friday so thought I would share my experience and a few photo's I took along the way.


I have a great hairdresser, which I find is half the battle, she really does listen and do exactly what I ask for. First she does/ bleaches my roots, I had at least 2inches of roots as I haven't been for about 2 and a half months. The bleach is applied to my dry hair, and I find it best to not wash my hair prior to the visit as any build up on the scalp acts as a barrier to the bleach and leaves less damage to the skin overall. Now I sit with the bleach on for at least 45mins, read a magazine, have a cup of tea, a girly chat with the hairdresser, generally a good time :)


This is me in my bleaching glory, I always want to shave one side of my head when they put my hair like this,  weird I know.

Near the end of this bleaching time they will put a little plastic bag over my head, I say over my head I mean hair, they do not try and suffocate me. This just makes things up there a little warmer and gets the bleach to react a little more. 


Ever so glamorous bag-head 


Once the bleach has done its thing they wash it all off, the roots are a delightful yellow colour. They roughly dry the hair then comes the toner. Now this part I dread, I actually hate it. I have sensitive skin and for some reason this just hurts and stings and I can't stand to have it on for very long. My stylist who also has white hair finds it painful too, its different for everyone though so don't be too worried, I'm just a wimp when it comes to toning. This eliminates all the yellow and makes the hair a cool ashy blonde colour. I can usually stand to have this on no longer than 5-10 mins, then it is washed off using the purple shampoo I mentioned in my previous hair care post.
After it is washed off I am a happy bunny again and shimmey over to get my hair cut and styled.
This process does damage the hair, and I usually find my scalp can be a tad "scabby" (mmmmmmmmm) for a few days after, but it is to be expected due to the amount of chemicals that are put on there.
Now the owner of the salon has ordered in especially for me, a product which claims to act as a complete barrier to the scalp for this process which will leave everything pain free and happy. I shall be trying this out on my next visit and do hope it works as I'll be able to sit for much longer with the toner on and get really white white hair :) I shall let you's know how it works out.
Here is the final result, the roots are not completely white, again this is because I can't sit for too long with the toner, but compared to my natural practically black roots it is a great improvement.


Last week, before the roots were attacked


After :)


Thank you for reading, Stay Classy 

Thursday 18 August 2011

Sickly Cute

Heres a few images I am loving this Thursday afternoon, all found on Pinterest:


Just a little "no reason" post. As you can tell I am the mood for sweets this afternoon :)
Stay Classy 

Hair Care : How to get and maintain white hair

It was just over a year ago now I decided I wanted to bleach my hair white, now being naturally extremely dark I knew this wasn't going to be easy, and yes I had some serious mishaps along the way, but I thought I would share my story and some tips in case its something you guys were thinking about doing.


Terribly unflattering old pic, but you get the jist of my natural colour, there will be more of these beauties so keep reading :)


First Tip: Usually best to go to a salon for this, I did all my colouring at home, and yes I managed to get it white, I did however lose a lot of hair and I am lucky I didn't end up bald.


After making the decision to go blonde I waddled to Sallys Beauty Supply and purchased 30vol cream bleach and a tub of blue bleaching powder. The brands and prices of which I am unsure about as it was a long time ago, but I'm sure the cream bleach itself was just their own make and was no more than £7 for a massive bottle, there will be loads for you to pick from though. I also bought gloves, mixing bowl, measuring jug thingy and an application brush. I hurried home and got to work, all instructions are on the bottles and the powder so you shouldn't go wrong. After the first bleach I had orange hair, after a second it was more of a "melon" yellow, and tbh it took a hell of a lot of bleaching sessions to get it near enough white. During these sessions I managed to put a giant slathering of bleach on one part of my hair and not blend it through, resulting in a nice chunk of hair falling out and slithering down my leg in the shower. 


Dying process journey in photographs ( Its not pretty you have been warned) 
After the first bleach
Second
Third, and yes I did have to go out in public looking like the above
This was the lighest I managed to get it myself, many bleaching sessions later.


That my friends was the final straw, I couldn't risk making myself anymore bald than I was, so decided to let the professionals take over.
The rest is history, they bleach my roots then tone the entire hair leaving it even and beautifully white/blue :)
Moral of the story is, yes you can bleach your hair at home and get pretty good results, but be extra careful and don't rush it, but if you can afford it, its best just to go to a salon. 
Now this leads on to my hair care tips and what I use to keep my hair in good condition now its has been bleached to within an inch of its life.
I use a moisturizing or hydrating shampoo and conditioner which I find takes away the dryness and helps to prevent it splitting and such. The one I am using at the minuite is Herbal Essences Hello Hydration, on offer for £1.50 for the full size bottle at Asda!! Basically you will need to use a shampoo & conditioner specially formulated for dry/damaged hair, there are millions on the market but this is my personal favorite and believe me I have tried them all. 


At least once a week I will use a purple shampoo, which helps combat any brassiness or yellow tones appearing in my hair. I will lather this into my hair, often using a large amount, and leave it for 10-20 minutes, if you find a good shampoo this will work a treat to keep your blonde hair cool in tone. I have tried the ones John Frieda has for blonde hair, but they did absolutely nothing for me, the colour was nowhere near purple enough to have any effect on my hair. I suggest using Clynol - Colour Care Reflex Silver Shampoo, now this is a salon exclusive but I'm sure you will be able to find it in a hairdressers near you. It is about £16 for a mamoth 1500ml bottle, and it comes with a handy pump dispenser . If not a much cheaper and almost equally effective shampoo to use would be the Pro:Voke Touch Of Silver Weekly Treatment. The price can vary but its usually betwen £1.99 - £3 for a 150ml bottle, and I have found it available in smaller local chemists as well as boots. 


Lastly I use a hair mask once a week to really boost the moisture levels in my hair, the one I have found most effective is the Dark&Lovely Ultra Cholesterol Conditioning Treatment. Again I have tried so many hair treatments in the past, from the "drugstore" products all the way up to high end, and I have found nothing which works as well as this on my chemically treated hair. It is sooooo cheap, I believe this is  available at Boots for £1.79 for 250ml. I usually slather on 1/4 of the tub ( I have short hair) and leave it on for as long as I have free time, usually about an hour or so before I have a bath. It leaves my hair so soft, tangle free and full of goodness. I love this product!


So a few added extra's are the usual leave in conditioner, I use a spray called Ion, I believe my mother purchased this for me so sorry I don't know the price, I believe it is available from Sallys though. This is good enough, although when this runs out I will be looking into finding a new one designed for treated or dry hair. 


For an added moisture boost on dry hair I will use Dark & Lovely Moisture Plus, again design for very dry and damaged hair. This contains olive oil and I use it on the ends of my hair when they are feeling rather depressed. Another great alternative would be the V05 Miracle Concentrate, which you can see a review on here


The last little extra I use is to help maintain the white/blue colour and this is John Frieda Sheer Blonde Colour Renew Tone Correcting Mousse. This is a purple mousse which I apply to damp towl dried hair before I blow dry. I know earlier I mentioned I didn't rate their shampoo and conditioner in this range, but I really do think this is a great product, you can really see the difference once the hair is dry and again it helps cncel out any brassiness leaving your hair a nice cool ashy colour. 


From the pictures it looks like I have literally lost all my hair, I didn't, I had it cut short. This decision was due to the fact my hair was in such bad condition due to my hap handed home bleaching sessions though. Now I am happy to inform you my hair is in lovely condition and I am growing it again, oh how I do miss having long hair and look forward to the day I no longer look like a boy.
Hope this has been helpful, thank you for reading.
Stay Classy


Wednesday 17 August 2011

A little thing called love,..

When it comes to scents and perfumes I am a hard gal to please. Whats smells good on others, on me usually smells like I have smeared myself in horribleness ( insert your own worst smell here). I usually stick to what I know and love in the scents department, my usual fav being Coco Mademoiselle by Chanel. It is my personal belief that Chanel perfumes are the best out there, yes they are pricey, but the quality is superb, the smells are complexed and deep yet they have the staying power, and last all day on me. So in my opinion they are worth the money as you use less daily and it lasts longer, if that makes sense. 
Yesterday I was given a generic gift set off mothergoose, and let me tell you it was not a special gift worthy day ( birthdays and such) so I was rather impressed. It is the Nomadic Ted set by Ted Baker. It comes in a nice little cosmetic bag, four decent sized travel products, but you know I wasn't expecting much, just thought it was a nice little prezzie for being the worlds best daughter, ho ho ho. 


How wrong I was, I opened the body spray, which isn't the aerosol type but you know the nice liquidy type and gave it a sniff ( how attractive), it is BEAUTIFUL. It is what I can only describe as a "sexy smell",.a smell which evokes all naughty but nice senses. As you can tell I am not great at describing scents as this is fastly becoming some kind of erotic blog post. 


I digress, I shall tell you what Ted Baker described this scent as, " Let Ted take you to paradise on his magic carpet of bergamont, tangerine, lychee, peach, plum and mysterious vetiver. Divine fragrance body spray is an exquisite combination of secret fruits, exotic flowers and rare woods delicately blended with amber for a truly magical experience".  You really can smell each and every ingredient described, which is why I like it as it has depth, all I can say is Mr Ted can take me to paradise on his magic carpet anytime now I have found this beaut. 


What I want to say is this is possibly the nicest smelling product I have ever smelled which wont break the bank. OK, so I loved the smell, and next though, yeah this wont last, again I was wrong, it has lasted 6 hours on my skin today and I have only just reapplied because I wanted too, not needed to, weird. 


So that was the body spray, next onto the other product that has "WOWED" me, the sugar scrub. Not only does it ooze that beautiful scent but is such great product, I used it in the bath last night and the formula is just amazing. Unlike the sugar scrubs I have tried in the past it almost lathers up as you use it, and doesn't just slide off the skin when it is wet, meaning I could really scrub away any dead skin ( again ever so attractive), and it left the nice smell on my skin. I am mega sensitive on my legs especially so for this to be scented and not irritate is a miracle I tell thee. The other two products in the set are a body lotion and a body wash, I haven't tried these yet, but again both smell delicious and after trying the first two I am expecting good things.
It seems like I have typed about these for ages, but you know when you just find something you love and get really excited about it, I am in one of those moods so thought I would share.


Oh PS: All products in this set are 50ml, and I strongly recommend you go give them a sniff :) 


Thanks for reading, Stay Classy xox

Tuesday 16 August 2011

FOTD,. My everyday look


Hello guys,. so this is going to be my first ever face of the day post, this is the look I usually go for everyday as its kinda neutral with a little splash of colour for added "flare".
Lets get started : 
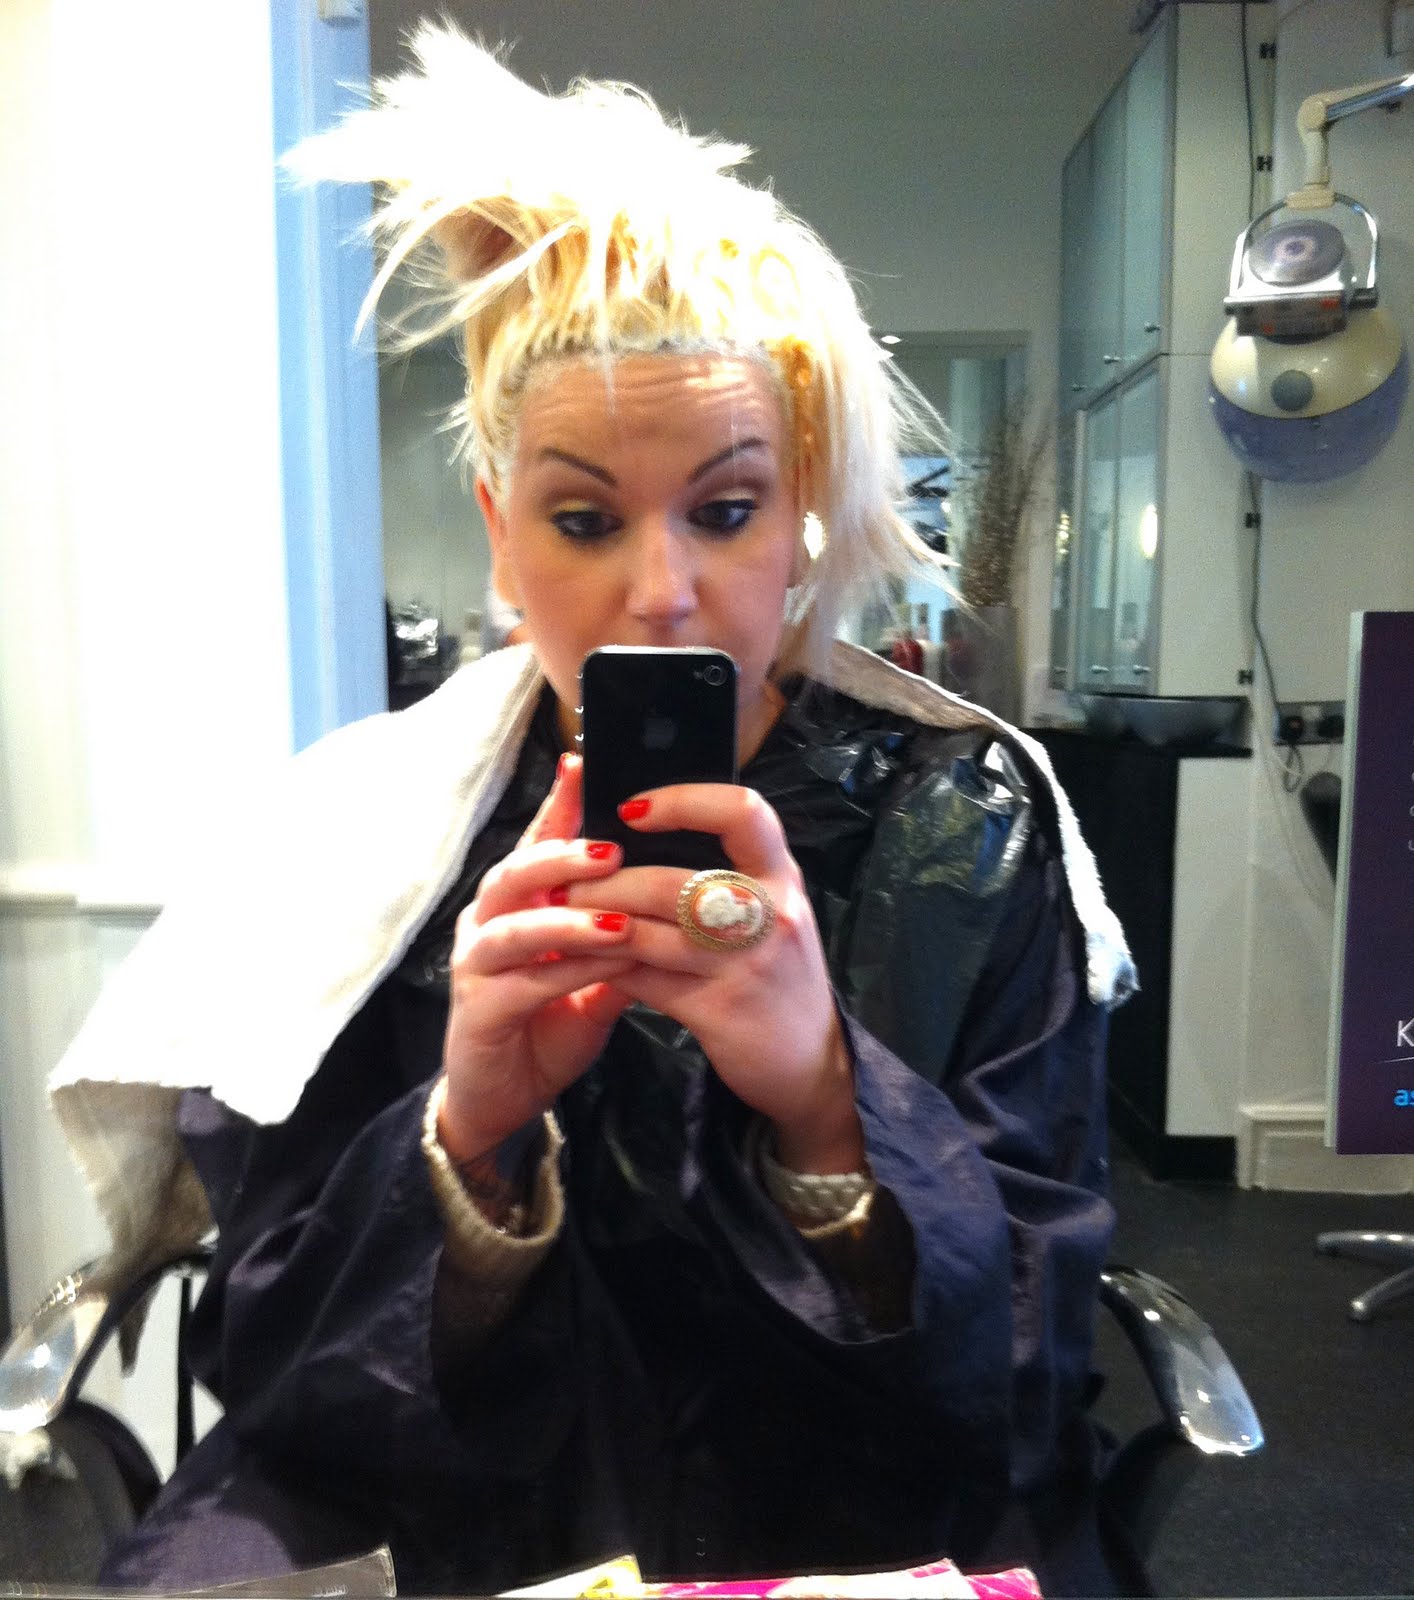
I have already applied my face make up, excuse the state of my hair etc, I do this after my make up so for now you will have to see me looking like a deranged badger.
On my face I am wearing :
  • Garnier Roll On, in the lightest shade under the eyes.
  • Rimmel Match Perfection foundation, 103 True Ivory.
  • Elf Complete Coverage Concealer, Light.
  • Elf Translucent Matifying Powder.
  • Elf Bronzer from the Blush & Bronzing kit, shade blushed/ bronze.
  • Mac Hocus Focus colourful face kit, for blush and highlight.
  • Elf Eyebrow Kit, in Dark ( I should really get a light one now I bleach my hair)


Onto the eyes, I will always apply a layer of mascara to the lashes as I am working on my face make up, so when I come to do my eyes the lashes are already curled and dry to apply a second coat of mascara at the end for full dramatic lashes.


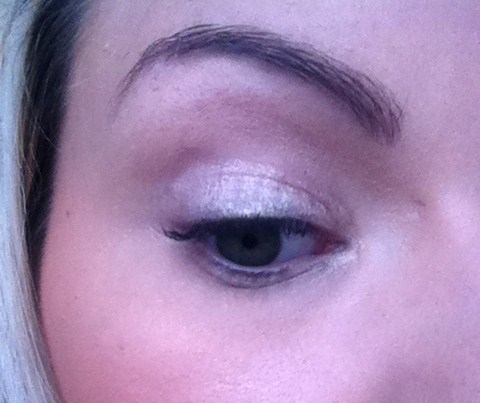
Firstly I apply Mac Paint Pot in Bare Study all over the lids to act as my primer. 
I have only recently purchased this in the last month but I swear by it now, I use it everyday and is seriously does not crease and keeps my shadow in place all day :)


Next I apply Mac shadow in Orb all over the lid using a No.7 Eye Colour Brush. This shade is very neutral and just makes my lids pop a little as it is a tiny bit lighter than my natural lid colour.


After this using a Mac 219 brush I apply Mac shadow in Gesso to my inner corner and blend out about 1/5 of the eye, to open up the eyes and make them "fresh as a daisy". This is a matte white, I don't want to use too much shimmer in this look. 
I then go into the outer "V" of the eye using Tequila Sunrise (orange shimmer) from the Sleek Curacao palette. I use another No.7 Eyeshadow Colour Brush to apply the colour then use a Crown IB119 Deluxe Crease brush to blend it out, this brush is very similar to the Mac 222 Tapered blending brush. I bring the orange colour about 1/4 into the eye from the outer corner.
Now onto the crease colour, I use a chocolate matte brown colour, any will do but for this look I use Yaby ws 231 Coco Powder. Starting from the outer end of the crease I apply the colour using a  Crown Brush IB116 Round Crease, this is a dupe for the Mac 219. I bring the colour 3/4 of the way through the crease and blend it upward slightly to create more definition as my crease could do with a bit of help ( hahaha now that sounds like a euphemism). 
Now this is done all that is left to do is blend the Coco Powder to create a nice soft edge using the Crown IB119 again and add a highlight across the brow bone. I use an Elf pan shadow in Ivory for this and using a Mac 227 sweep this all the way under my eyebrow and down at the outer edge to meet the crease colour.
Lastly I use Urban Decay 24/7 liner in Zero on my lower waterline, Rimmel Glam Eyes liquid liner on the upper lashline and slatherings of Rimmel Max Bold Curves Mascara over both sets of lashes.


And this is the completed look. I have Mac Courting Lilac on the lips with a touch of Revlon Lilac Pastelle Lipgloss.


Hope you like.

Thanks for reading, Stay Classy xox.


Monday 15 August 2011

Weekend of arty fun and some snaps


 Ahoy there!!!
Every weekend I struggle to find something "good" to do, which won't cost a fortune and will enrich my soul (haha), rather than leave me broke or extremely hungover. So I was rather excited when Will mentioned there would be an Arts Festival going on rather near the city centre. After a bit of googling, as the promo for it wasn't great I found out what was happening where and like the organisational freak I am set up a nifty little itinerary for us, much to his delight, I have a degree in Fine Art, he studied business and the likes, so I wasn't expecting him to be that overjoyed.


I just thought I would share a few little snaps I took while we were mooching around.


 There was all sorts to see and do, from burlesque classes and comedy classes to baking, short films and story readings, not to mention photography plastered all over Heaton.


I LOVE this, it is all sewn into this snazzy picture, from a distance it just looks like paint :)


There was an exhibition in a local church which was for all local artist's and art groups and also work from day patients at St. Oswald's, most was for sale and I just thought it was such a nice idea for such a good cause and if the patients get some joy from being creative its a win win situation.

Sorry if this post seems a tad boring, I just really enjoy these kind of events and wish there was more of them also I have been totally inspired to make some work of my own again :) maybe I shall post some on here or do tutorials.
Thanks for reading
Stay Classy